


Bells
Animal Crossing
Reign of the Warlock has reshaped how players approach endgame charm hunting in Diablo 2 Resurrected. Among the biggest additions are the reworked Sunder Charms, which now exist in two forms: Latent and Renewed. These items have become a staple piece of gear for nearly every elemental build, and learning the systems behind them is the difference between a frustrating grind and a rewarding farm session.
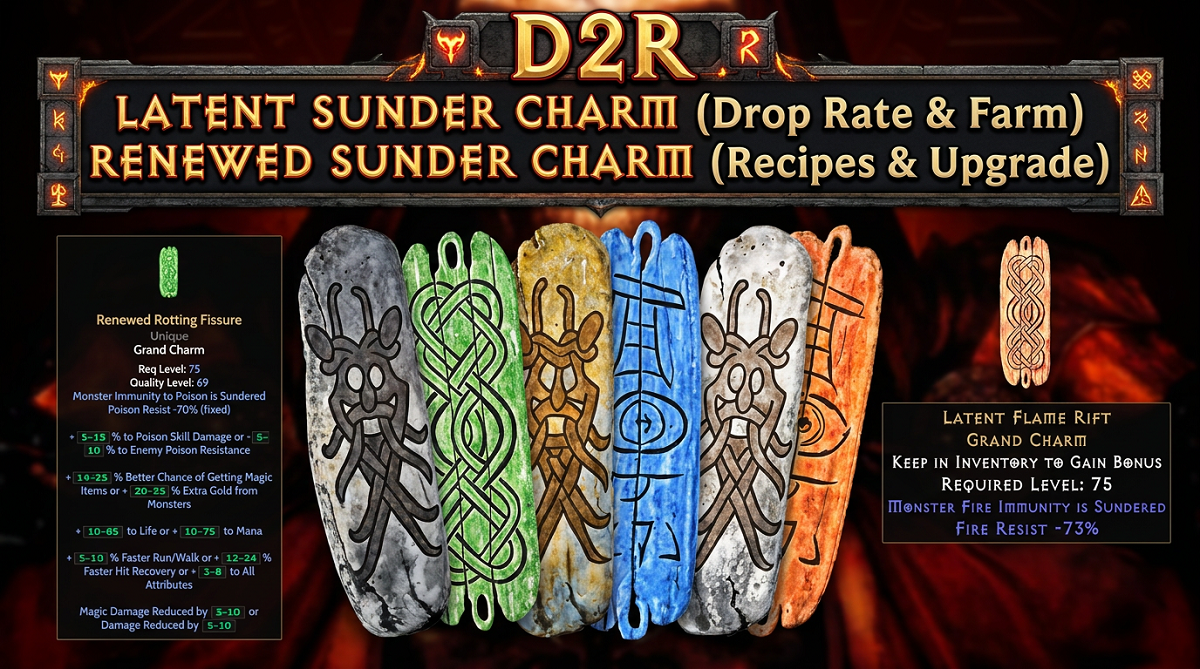
To set the stage, Sunder Charms are a set of six Unique Grand Charms designed to break a single Immunity type, allowing nearly every character to farm anywhere they want. With Reign of the Warlock, the system was reworked: Heralds now drop Latent Sunder Charms, which are weaker base versions, and players use a Horadric Cube recipe to convert them into the more powerful Renewed Sunder Charms with up to five additional affixes rolled from a randomized pool. The result is a charm that functions like a "rainbow facet" sitting in your inventory, combining immunity-breaking with skill damage, life, mana, FHR, magic find, and more.
The two halves of this guide cover everything you need: first the Latent charms (what they are, where they drop, drop rate, and how to farm them efficiently), then the Renewed charms (recipes, affix pool, mechanics, and build considerations).
Latent Sunder Charms are the base versions you'll find while farming. They carry the immunity-breaking effect at the lowest end of the stat range and exist primarily as the raw material for crafting Renewed versions. Below is a full look at what they do, where they drop, and how to optimize your farm.
Each charm targets one damage type. When equipped, any monster immune to that damage type has its resistance set to 95% instead, allowing your skills to actually deal damage.
Latent Black Cleft – Monster Magic Immunity is Sundered (Magic Resist -45%)
Latent Bone Break – Monster Physical Immunity is Sundered (Physical Damage Received Increased by 10%)
Latent Cold Rupture – Monster Cold Immunity is Sundered (Cold Resist -70%)
Latent Crack of the Heavens – Monster Lightning Immunity is Sundered (Lightning Resist -70%)
Latent Flame Rift – Monster Fire Immunity is Sundered (Fire Resist -70%)
Latent Rotting Fissure – Monster Poison Immunity is Sundered (Poison Resist -70%)
⚠️ Warning: Your character also loses a large amount of resistance of the same type. Plan your gear accordingly.
Before farming, a few mechanics to keep in mind so you build correctly around your charm:
Sunder applies before any other source of -% Enemy Resistance.
The effect only applies to the character holding the charm, your mercenary and party members do not benefit.
Lower Resist, Conviction, and Cold Mastery all apply at 1/5 of their normal value after a monster has been sundered.
Other -% Enemy Resistance sources apply at full effectiveness, but only after Sunder has flipped the immunity flag.
You can equip multiple Sunder Charms at the same time, but stacking the same one only deepens your own resistance penalty.
After Patch 3.2, Latent Sunder Charms now drop from two completely different sources, which fundamentally changes how players can farm them. Understanding both paths helps you decide whether to grind Heralds, general Magic Find runs, or a mix of both.
Heralds drop Latent Sunder Charms through two internal paths combined:
Normal Path: The standard Jewel C Treasure Class, where a Magic Grand Charm roll can be promoted to a Unique Grand Charm via your Magic Find.
Specialized Path: A dedicated Sunder Charm Treasure Class that only Heralds have access to.
Because Blizzard nerfed the Heralds' Unique/Set/Rare factor from 989 down to 800, the specialized path is now the dominant contributor to drops. The result is that Player Count has no effect on drop chance, and Magic Find barely matters. The only variable that meaningfully changes the drop rate is the Herald Tier.
The simplified takeaway:
| Herald Tier | Sunder Charm Drop Rate |
|---|---|
| Tier 1 (Herald of Fright) & Tier 2 (Herald of Dread) | ~1 in 100 |
| Tier 3 (Herald of Fear) & Tier 4 (Herald of Horror) | ~1 in 67 |
| Tier 5 (Herald of Terror) | ~1 in 50 |
Drop rates are also weighted between specific charms. Cold Rupture and Flame Rift are the most common, while Bone Break and especially Black Cleft are significantly rarer. For example, on a Tier 5 kill, Cold Rupture or Flame Rift sits around 1 in 170, Crack of the Heavens around 1 in 255, Rotting Fissure around 1 in 420, Bone Break around 1 in 820, and Black Cleft around 1 in 1,600.
Blizzard removed the special condition that previously locked Sunder Charms to Heralds only. Now, any monster that can drop Gheed's Fortune can also drop a Latent Sunder Charm. The game runs through Treasure Class selection until a Grand Charm is rolled, then applies the Magic Find formula to decide if it becomes a Unique. If a Unique Grand Charm is rolled, the result is now selected from the entire Unique GC pool, Gheed's Fortune plus all six Sunder Charms.
Important details for this drop path:
All six Sunder Charms are equally weighted here. Unlike Heralds, there is no preference toward Cold or Fire. This is the only way to reliably target rarer charms like Bone Break and Black Cleft.
Both Player Count and Magic Find affect drop probability, just like normal Unique drops.
Sunder Charms can drop in Hell and Nightmare difficulty, in Terrorized and non-Terrorized zones, as long as the area level is 69 or higher. This means high-level Nightmare TZs (level 69+) can drop them.
Gheed's Fortune is now roughly 7x more rare than before, since it now shares the Unique GC pool with all the Sunder Charms.
For non-Herald drops, Act Bosses are the strongest farm targets. With 350 MF, a Hell Andariel kill in a Terror Zone has roughly a 1 in 255 chance to drop any Latent Sunder Charm at Players 1, dropping all the way to about 1 in 165 at Players 7. Other strong targets include Hell Baal TZ, Hell Duriel TZ, and Hell Mephisto/Diablo TZ runs, all sitting in the 1-in-360 to 1-in-500 range.
Patch 3.2 also rewrote how Heralds spawn. The old "2% per Elite kill" coin-flip is gone. The new system uses a logistic function based on your zone completion percentage (the share of monsters killed in the Herald spawning zone). The more of the zone you clear, the higher the chance your next kill triggers a Herald.
Each Tier has its own logistic curve. A few key thresholds:
Tier 1 and Tier 2 require very high zone completion (~52%+) before they have any chance to spawn.
Tier 3 and Tier 4 start contributing at around 30–42% completion.
Tier 5 starts spawning as early as ~10% zone completion and ramps up smoothly to ~2.35% per kill at full clear.
When a Herald spawns, your kill counter for that zone resets to zero. This is a critical mechanic: the curves for Tier 2, 3, and 4 ramp up so late that you usually won't have enough remaining monsters in a zone to spawn them after Tier 1 has appeared. In practice:
If you're farming a single Terror Zone, you are almost guaranteed to get a Tier 1 Herald.
Tier 2 is unlikely to appear in the same zone.
Tiers 3, 4, and 5 are essentially impossible without bouncing to fresh Herald spawning zones to chain Tier upgrades.
Inside the game files, each Herald spawning zone is defined by a zone_data_id. Some Terror Zones contain multiple independent spawning zones, while others span multiple area levels with weighted contributions. This is important to grasp because it changes how you should clear:
Blood Moor and Den of Evil are two separate Herald spawning zones inside the same Terror Zone. Clearing one does not contribute to the other.
Cathedral, Catacombs Levels 1–4, and Inner Cloister are all combined into a single spawning zone, with each level carrying a different weight. Clearing only Catacombs 2–4 puts you at roughly 58% zone completion, not 100%.
Barracks and Jail are two separate Herald spawning zones. The three Jail levels share one zone with equal weight (each level = 33%).
Far Oasis and each Maggot Lair level are all individual, independent spawning zones.
Knowing zone groupings tells you when to keep clearing for additional Heralds and when to bounce to a new area for a fresh chance.
Combining the spawn formula with average monster counts per zone produces an expected ~91 Tier 5 Heralds per full game clear if you assume Tier 5 is already unlocked. The realistic number is closer to ~87, since you need 3–4 zones at the start of a session to chain through Tiers 1 through 4.
A few highlights from the per-zone numbers:
Worldstone Keep + Throne: ~2.05 expected T5 Heralds (best single zone)
Cow Level: ~1.94 expected T5 Heralds
Flayer Jungle, Arcane Sanctuary, Bloody Foothills: ~1.90+ each
Average Herald spawning zone: ~1.23 expected T5 Heralds
Spider Cavern: ~0.56 (lowest)
Most zones are roughly equivalent, so there is no single "must-farm" location — variety and density both work.
With ~87 Tier 5 Heralds per game and a 1-in-50 Sunder drop rate from Tier 5, you can expect roughly 0.57 P1 game clears per Latent Sunder drop purely from Heralds. Compared to the old patch (where it took 9–14 P1 clears to see a single Sunder Charm), this is a massive improvement. And that's before counting all the additional Sunder Charms now dropping from regular monsters and Act Bosses.
Research into the Herald spawn algorithm produced some clear takeaways for farming efficiently.
Player count and magic find have no effect on Sunder Charm drop rates from Heralds. Equip your fastest damage gear and run players 1 if you want quicker clears. Higher player counts only help if you're chasing the secondary monster drop table.
Herald spawn chance is almost entirely driven by zone completion percentage. Some zones are linked — the Burial Grounds, Crypt, and Mausoleum all share one Herald spawning zone, and the Catacombs Levels 1–4 are all a single zone too. Killing in any of them contributes to the same percentage.
Tier 1 and 2 Heralds need around 52% zone completion before they can spawn. Tiers 2 and 3 require ~42%. Tier 5 starts becoming possible at just ~10% completion. Once you spawn a Herald, your zone progress resets to zero, so if a small zone has too few monsters left, just bounce to the next Herald spawning zone instead of trying to force a spawn.
If you get a Tier 1, 2, or 3 Herald and the zone has limited monsters left, leave. The "dead zone" before another Herald can spawn is too large to overcome. For Tier 5, the curve is more forgiving, so you can often stay and chase another spawn.
If your Tier 5 Herald spawns late into a zone (say 70%+ completion), the remaining monsters won't give you enough room for another Tier 5 attempt. Move on to a fresh Herald spawning zone.
Here are some practical pointers gathered from the community:
Solo farmers should clear nearly the whole Herald spawning zone, including trash mob packs, not just elites. Trash kills count toward zone completion.
Group play makes Tier 5 Heralds much faster to reach since multiple players push the kill count higher.
Use Worldstone Shards to terrorize whole acts. You'll naturally collect more shards while clearing, so don't hoard them, using them keeps the Herald pipeline flowing.
Pick a build with strong AoE clear and decent survivability. Bisarc-style sorceresses, Novas, and Hammerdins are popular early-season picks because they handle Tier 5 Heralds without needing Sunder support themselves.
Avoid terrorized zones with enchantments that conflict with your damage type, such as a Cold Sorc walking into Cold Enchanted packs.
Once you have a Latent in hand, the next step is converting it into its upgraded Renewed form. Renewed charms carry the same immunity-breaking effect at perfect roll values, plus five additional affixes rolled from a defined pool. This is where Sunder Charms transform from a niche utility item into one of the most powerful inventory pieces in the game.
One key detail before crafting: even a poorly rolled Latent (say -83% resistance) will reroll to the perfect -70% on the upgraded Renewed version. So never throw out a "bad" Latent — keep it and craft.
Here are the six conversion recipes:
| Latent Charm | Recipe | Renewed Charm |
|---|---|---|
| Latent Rotting Fissure | + Perfect Emerald + Ko Rune + Western Worldstone Shard | Renewed Rotting Fissure |
| Latent Cold Rupture | + Perfect Sapphire + Lum Rune + Eastern Worldstone Shard | Renewed Cold Rupture |
| Latent Crack of the Heavens | + Perfect Topaz + Fal Rune + Southern Worldstone Shard | Renewed Crack of the Heavens |
| Latent Flame Rift | + Perfect Ruby + Io Rune + Deep Worldstone Shard | Renewed Flame Rift |
| Latent Bone Break | + Perfect Amethyst + Pul Rune + Northern Worldstone Shard | Renewed Bone Break |
| Latent Black Cleft | + Perfect Diamond + Mal Rune + Southern + Deep + Northern Worldstone Shards | Renewed Black Cleft |
The Black Cleft is the standout of the bunch, it requires three Worldstone shards and a Mal rune, which is why it tends to be the most expensive upgrade.
Every Renewed Sunder Charm rolls a fixed Sunder effect at its maximum value, plus five additional random affixes, exactly one stat picked from each of the five affix groups. Below is the complete list of all six Renewed Sunder Charms with every possible affix that can appear on them.
Fixed effect:
Monster Cold Immunity is Sundered
Cold Resist -70%
Possible affixes (one per group):
Group 1: +5–15% to Cold Skill Damage OR -5 to -10% to Enemy Cold Resistance
Group 2: +14–25% Better Chance of Getting Magic Items OR +20–55% Extra Gold from Monsters
Group 3: +10–65 to Life OR +10–75 to Mana
Group 4: +5–10% Faster Run/Walk OR +12–24% Faster Hit Recovery OR +3–8 to All Attributes
Group 5: Magic Damage Reduced by 5–10 OR Damage Reduced by 5–10
Fixed effect:
Monster Fire Immunity is Sundered
Fire Resist -70%
Possible affixes (one per group):
Group 1: +5–15% to Fire Skill Damage OR -5 to -10% to Enemy Fire Resistance
Group 2: +14–25% Better Chance of Getting Magic Items OR +20–55% Extra Gold from Monsters
Group 3: +10–65 to Life OR +10–75 to Mana
Group 4: +5–10% Faster Run/Walk OR +12–24% Faster Hit Recovery OR +3–8 to All Attributes
Group 5: Magic Damage Reduced by 5–10 OR Damage Reduced by 5–10
Fixed effect:
Monster Lightning Immunity is Sundered
Lightning Resist -70%
Possible affixes (one per group):
Group 1: +5–15% to Lightning Skill Damage OR -5 to -10% to Enemy Lightning Resistance
Group 2: +14–25% Better Chance of Getting Magic Items OR +20–55% Extra Gold from Monsters
Group 3: +10–65 to Life OR +10–75 to Mana
Group 4: +5–10% Faster Run/Walk OR +12–24% Faster Hit Recovery OR +3–8 to All Attributes
Group 5: Magic Damage Reduced by 5–10 OR Damage Reduced by 5–10
Fixed effect:
Monster Poison Immunity is Sundered
Poison Resist -70%
Possible affixes (one per group):
Group 1: +5–15% to Poison Skill Damage OR -5 to -10% to Enemy Poison Resistance
Group 2: +14–25% Better Chance of Getting Magic Items OR +20–55% Extra Gold from Monsters
Group 3: +10–65 to Life OR +10–75 to Mana
Group 4: +5–10% Faster Run/Walk OR +12–24% Faster Hit Recovery OR +3–8 to All Attributes
Group 5: Magic Damage Reduced by 5–10 OR Damage Reduced by 5–10
Fixed effect:
Monster Physical Immunity is Sundered
Physical Damage Received Increased by 10%
Possible affixes (one per group):
Group 1: +75–100% Enhanced Damage OR -5 to -10% to Enemy Physical Resistance
Group 2: +14–25% Better Chance of Getting Magic Items OR +20–55% Extra Gold from Monsters
Group 3: +10–65 to Life OR +10–75 to Mana
Group 4: +5–10% Faster Run/Walk OR +12–24% Faster Hit Recovery OR +3–8 to All Attributes
Group 5: Magic Damage Reduced by 5–10 OR Damage Reduced by 5–10
Note: Bone Break is the only Renewed charm with the Enhanced Damage roll in Group 1, replacing the standard "Skill Damage" affix that other charms get. This makes Bone Break especially flexible for both melee builds (taking +ED) and physical caster builds like Tornado Druids (taking -% Enemy Physical Resistance).
Fixed effect:
Monster Magic Immunity is Sundered
Magic Resist -45%
Possible affixes (one per group):
Group 1: +5–15% to Magic Skill Damage OR -5 to -10% to Enemy Magic Resistance
Group 2: +14–25% Better Chance of Getting Magic Items OR +20–55% Extra Gold from Monsters
Group 3: +10–65 to Life OR +10–75 to Mana
Group 4: +5–10% Faster Run/Walk OR +12–24% Faster Hit Recovery OR +3–8 to All Attributes
Group 5: Magic Damage Reduced by 5–10 OR Damage Reduced by 5–10
Note: Black Cleft is the rarest and most expensive Renewed charm to craft (requiring a Mal Rune and three different Worldstone Shards). It's the only Sunder Charm that breaks Magic Immunity, particularly valuable for Hammerdins and other magic-damage builds.
For quick reference, here is a side-by-side view of the affix pool that all six Renewed Sunder Charms draw from:
| Group | Possible Affixes | Notes |
|---|---|---|
| Group 1 | Element Skill Damage OR -% Enemy Element Resistance (or +ED for Bone Break) | Build-defining damage roll |
| Group 2 | Magic Find OR Gold Find | MF preferred for most builds |
| Group 3 | Life OR Mana | Life preferred except for mana-hungry builds |
| Group 4 | FRW OR FHR OR All Attributes | FHR and All Attributes are top picks |
| Group 5 | Magic Damage Reduced OR Damage Reduced | Defensive utility |
A "perfect" Renewed Sunder Charm typically combines: max element-specific Group 1 roll + 25% MF + 65 Life + 24% FHR (or +8 Attributes) + 10 of either Damage Reduction.
Some affixes carry far more weight than others when valuing a Renewed charm:
24% Faster Hit Recovery is widely considered the top roll in Group 4. Reaching key FHR breakpoints lets you swap out FHR-focused inventory pieces for more life skillers, which adds up to roughly 40–45 extra life per slot when amplified by CTA.
+8 to all Attributes is the best alternative pick from Group 4, scaling well across nearly every build.
Element-specific skill damage or -% Enemy Resistance depends on your build. Casters chasing maximum damage usually want the minus-resist roll, while pre-buff-style builds (like Demon Machine sorcs) often prefer the additive skill damage.
25% Magic Find combined with a 40 MF Gheed's gives you a clean 65 MF in your inventory before any gear contributions.
Life vs. Mana comes down to the build, Warcry Barbs lean heavily on mana, while most other builds prefer the larger life pool.
Faster Run/Walk is generally the weakest pick in Group 4 and brings the value of a charm down compared to FHR or Attributes rolls.
Here are a few example crafts that illustrate the range of outcomes:
Renewed Rotting Fissure: 7 FRW, 13% Poison Skill Damage, 58 Life, -70% Poison Res, 24 FHR, 10 Magic Damage Reduced, solid all-around roll.
Renewed Crack of the Heavens: 22 FHR, -9% Enemy Lightning Res, 18 Life, -70% Lightning Res, 20 MF, a hefty trade-grade charm.
Renewed Flame Rift: FRW, 14% Fire Skill Damage, 60 Life, MF, FHR — strong support for an Enchant pre-buff sorceress.
Renewed Bone Break: Either a -% Physical Enemy Resistance roll (great for Tornado Druids and Warcry Barbs) or a +ED roll up to +100% (great for melee).
Renewed Black Cleft: 22 MF, 10 Magic Damage Reduced, 24 Mana, +Attributes, 15% Magic Skill Damage, the most expensive to craft and often the most valuable.
The Renewed charms function the same way the Latent versions do regarding immunity-breaking:
Sunder applies first, before any other -% Enemy Resistance source.
Only the character wearing the charm benefits — mercs and party members keep facing the original resistances.
Auras and curses (Conviction, Lower Resist, Cold Mastery) work at 1/5 effectiveness on sundered monsters.
Other -% Enemy Resistance sources retain full effect.
For example, a Fire build using Flame Rift versus a 120% Fire Resist monster sees its resistance set to 95%, then reduced further by Infinity (-17%) and a Necromancer's Lower Resist (-6%), landing at 73% Fire Resistance. The Necromancer in the same party, without a Sunder Charm, still sees that monster at 97%.
The Latent and Renewed Sunder Charm system rewards both farming patience and crafting strategy. Knowing the recipes saves you wasted ingredients, knowing the Herald spawn rules saves you wasted hours, and knowing the affix pool helps you judge a charm's value at a glance. Farm Tier 5 Heralds aggressively, hold onto every Latent you find regardless of its initial roll, and convert when you have the runes and shards lined up. Once you do equip a well-rolled Renewed charm, the game opens up enormously — virtually every zone becomes farmable on a single character, and that's exactly why these charms have become one of the most rewarding chase items in Reign of the Warlock.


