


Bells
Animal Crossing
In Path of Exile 3.27, strongboxes remain one of the most rewarding (currency, scarabs, or that elusive jackpot drop) and enjoyable farming options, especially with new map tiers and evolving league mechanics. This guide outlines the updated approach for T17 strongbox farming, the best Atlas tree setups, and the most effective strategies to maximize your returns, including both premium and budget options.
Strongboxes are special chests found within maps that spawn monsters and drop additional loot when opened. Their appeal comes from the possibility of duplicating valuable drops, like currency, divination cards, and even rare items such as Mirror of Kalandra or Apothecary cards. With the right Atlas passives and scarab setup, opening strongboxes can flood your inventory with currency, scarabs, and unique cards. The removal of scarabs from other sources this league has made strongbox-focused strategies even more lucrative, as scarabs are now rarer and more valuable. The main challenge is the RNG nature of strongboxes, some maps may be dry, but a lucky run can yield massive profit or even double jackpot drops.
This strategy revolves around running T17 maps with every possible boost to strongboxes, using a setup based on the Containment Scarab. The method has delivered over 300 divines in just a few days, with profits coming from raw currency, scarabs, divination cards, and unique drops. By stacking every strongbox and scarab-related benefit on the Atlas tree, and combining that with optimal map rolling and scarab use, the loot streams in from all directions. The strategy is tried and tested, having survived many leagues without nerfs, and remains highly effective, especially early in a league.
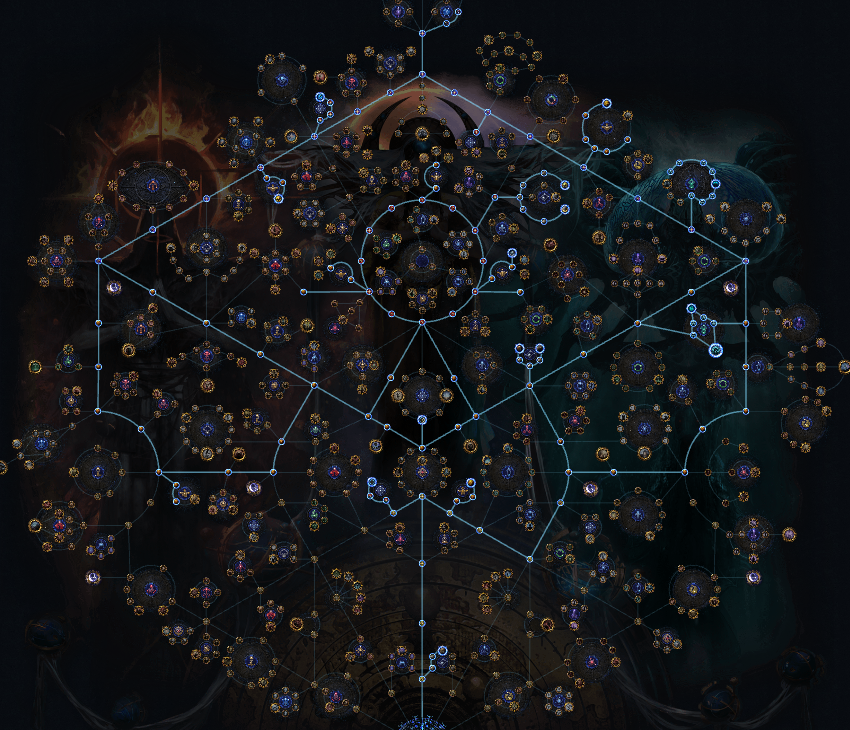
Start by taking every strongbox node and all available map effect passives. There are only three main box wheels to pick up, so the choice is simple. Add every scarab node, as there isn’t much else of value to spend points on for this strategy. With 126 Atlas points, you’ll already have most of what you need, and any extra points can go into additional scarab nodes.

For scarabs, the setup uses one of each type: Potency, Compartment, Containment, Ambush, and Discernment. This covers all box scarabs for maximum effect. Always use Kirac’s Ambush for additional strongboxes, ensuring every map is loaded with as many boxes as possible.
Focus on T17 maps, as these provide the best returns. T16.5 maps can work, but T17 brings extra value, especially with fortress maps containing barrels that drop bonus loot scaling with currency and scarab modifiers. Prepare each map by fully chiseling it (using either regular or master chisels), then roll for a mix of 100% more scarabs and currency, paired with mods your build can handle. Avoid maps with dangerous mod combinations, such as penetration with negative maximum resist. If a map reaches 126% more currency with 100 quantity, it’s ideal.
A single Delirium Orb can be added to each map for extra monsters and loot. This is optional, but most players prefer it for the increased rewards.
Once inside, clear every strongbox. The loot will include a large amount of raw currency—divines, chaos, and assorted gumball currency—along with scarabs, unique drops, and fragments. The profit comes from all these sources, and regular liquidation of loot is recommended due to the volume and value.
Choose either red or blue alters based on your build and current market prices. Both are equally viable for this method.
Expect profits to fluctuate with scarab prices. Recent runs showed about 21 divines net from 10 maps, or 12–15 divines per hour given current prices. In previous days, the same strategy yielded over 20 divines per hour. The key is that the profit comes from several sources, and the loot is consistently broad and valuable.
This alternative focuses on T17 maps with a minimal investment in scarabs. Over the course of just a few days, the strategy has yielded a steady profit, even allowing for investments into higher-value items. Rather than using the contamination scarab, this setup uses three ambush scarabs, one potency scarab, and one discernment scarab to boost the number and quality of strongboxes. The process brings in a mix of small currency drops, valuable fragments, and consistent profit, though it does require a well-geared character due to the difficulty of the content.
Allocate points into every strongbox node you can find, focusing on increasing the quantity and rarity of boxes. The aim is to secure more scarabs and rare monsters, along with any nodes providing additional explicit modifiers for strongboxes. The tree setup is straightforward: just get the strongbox notes, more scarabs, and a few extra explicit modifiers.

Select T17 maps and prepare them for runs by applying quality to each map. Instead of the contamination scarab, slot in three ambush scarabs, one potency scarab, and one discernment scarab. On top of that, roll the maps for modifiers such as more scarabs and more currency.
Enhance each map by applying a delirium orb and using the ambush option on the map device to increase the number of strongboxes that appear. This adds further density and loot potential to every map run.
This approach is not for undergeared characters—the content is tough, so a solid build is important. Clearing the maps and dispatching bosses both require strong gear, so be prepared for a challenge.
Head into each map and open every strongbox you find. After a full set of runs, expect to see a pile of currency, fragments, and various other drops. Track your expenses on maps and scarabs to get a sense of your net profit. For example, running eight maps with this method brought in 15 divines, subtracting costs for a total of 11.4 divines profit in just over an hour. Some runs may yield less, while others can be much better.
The strategy is reliable for generating currency and other valuable drops, and it can be quite enjoyable. Watching currency pop out with each box is satisfying, and the fragments add up as well. While not the simplest method, it offers a rewarding experience for well-prepared players who enjoy strongbox content.
This strategy focuses on maximizing returns from strongboxes on lower-cost maps, making it a great option for the early league or for players who aren’t ready for T17 content. Strongboxes are a favorite among viewers, and this method leverages the high RNG potential they offer, sometimes an Arcanist will drop two Divines, or a Diviner’s will yield two valuable cards, such as Hinekora’s Lock or even a double Mirror of Kalandra. While the results can swing wildly, most runs come out ahead thanks to the steady income from currency and scarabs, especially this league where scarabs are more valuable due to their lower supply.
Allocate points to every strongbox node, prioritizing duplication for currency and divination cards, which guarantees that drops like Apothecary or Mageblood cards always come in pairs. The tree is heavily oriented toward scarabs, collecting every scarab node possible except for those that aren’t cost-effective. Focus on increased chance for Ambush Scarabs and extra explicit modifiers for strongboxes, as these drive up both the quantity and quality of loot. Nodes for Chiseled Perfection and increased map originator chance are also included for additional value. While there are points you could take for map duplication, these are less valuable for this method.
Select a map layout you enjoy—Jungle Valley is a great example, especially since you can avoid the boss and keep your mapping pace up. For added profit, transfer cards from a map like Defiled Cathedral, which drops valuable cards such as Seven Years Bad Luck and Apothecary, to the map you are farming by utilizing the scry map feature given by the Nameless Seer NPC. Increase your odds of running into this NPC by boosting map quantity with chisels, alchemy, and even Vaal orbs for eight-mod corrupted maps.
Run three Ambush Scarabs for each map, each adding three additional strongboxes, and use an Ambush Scarab that offers a 15% chance to reopen a strongbox after it’s cleared. Another Ambush Scarab increases the rarity of strongboxes, improving your chances of finding Arcanist and Diviner’s boxes. There’s also the option to use a Potency Ambush Scarab, which boosts box modifiers by 75% at the cost of three boxes, try both setups to see which fits your playstyle and budget.
Apply one Delirium Orb per map to inject a large number of delirium monsters, and always chisel maps to increase quality. Roll with alchemy, and if you get an undesirable mod (like Elemental Reflection if your build can’t handle it), use a scouring orb and reroll until you’re satisfied. The total cost per map, including scarabs and orbs, can be kept around 30 chaos, which is very affordable for most players.
Focus on blue altars that offer duplication or currency rewards, and watch for altars that buff monsters or bosses with Divine Orb drops. Take care not to overdo altar clicking, as some can make maps much harder and increase your risk of dying, especially if playing a squishier build. Adjust your altar selection based on your build’s durability.
Always run anti-freeze protection, as strongboxes can freeze you on opening. You can get this from a flask or, ideally, from the Brine King pantheon fully unlocked with a Divine Vessel from an Underground Sea map boss. Without this, opening boxes can often result in death and wasted time.
Clear all strongboxes, open breaches and fortresses when you find them, and skip bosses unless you need to for invitation progress (every 28th map). The strongboxes and altars will provide a steady flow of currency, scarabs, cards, and occasional jackpots like double Divines or rarer cards. Exchange bulk loot—like Jewelers, Fusings, Chromatics, and scarabs—for Divine or Chaos Orbs through trade or bulk-selling services. Diviner’s boxes can provide gambling cards and rare drops that further supplement your earnings.
While outcomes vary due to RNG, most runs come out ahead, especially over sets of 20–30 maps. It’s common to have dry spells, but jackpots like double Hinekora’s Locks or Mirror of Kalandra do happen, and the steady income from currency and scarabs adds up. Avoid running this strategy if you only have a couple of maps—wait until you can sustain runs of 20–30 for the best experience.


