


Bells
Animal Crossing
Path of Exile 2 has revitalized temple farming with the Vaal Temple system, offering a complex blend of strategy, risk, and reward. Many players are eager to optimize their temple layouts and maximize loot, especially with the advent of new mechanics and medallions. This guide details room connections, upgrade routes, the value of medallions, and how to set up a profitable Vaal Temple farm in Path of Exile 2: The Last of the Druids.
The Vaal Temple in Path of Exile 2 0.4 brings a strategic layer to farming, blending room placement, upgrades, and medallion usage. The temple is not just about running content, but about methodically expanding and maintaining a chain of valuable rooms. Players are able to amass impressive rewards, such as raw divine orbs, by carefully managing their temple’s structure and leveraging the right upgrades. With recent updates, certain rooms and strategies have become more lucrative and vital for sustained farming.
The foundation of this system lies in constructing a long, connected sequence of valuable rooms. Each room must connect back to the start tile, and destabilization events threaten to remove "loose" or unprotected rooms first. The removal process cannot break the main chain, making the preservation of your core sequence important.
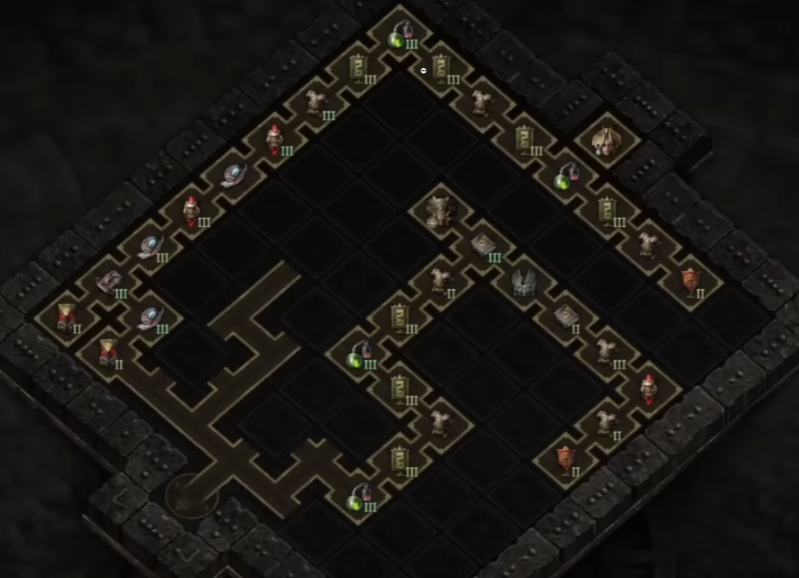
Every run can destabilize the temple, deleting a handful of rooms—usually targeting unprotected ones first. The key is to build protective measures using medallions and to use expendable rooms as bait for destabilization. The process demands patience, especially early on, as the temple grows gradually, often by just one room per cycle.
Medallions are at the heart of the upgrade and protection system. For example, the Jatalot medallion can preserve a key room, while the Quippalatl upgrades a room’s level. Zopex medallions increase the maximum crystal capacity, letting you store more runs before needing to enter the temple. Ascappers medallions raise the medallion storage cap, vital for longer sequences.
| Room Name | Effect / Reward | Upgraded By / Combo | Upgrades Into |
|---|---|---|---|
| Treasure Vault | Chests (always destroyed) | - | - |
| Armoury | +8/15/30% Human XP, 4 Chests (rarity dependent) | - | - |
| Commander | +8/15/30% Rare monster effectiveness, Boss at T3, Workbench | 2–3+ Guardhouses | - |
| Garrison | +10% Monster Packs, +0/8/16% Monster Effectiveness, Workbench | Guardhouse + Depot | - |
| Generator | +8/15/30% Construct XP, 4 Chests (rarity dependent), Workbench | Golem Works | - |
| Golem Works | ??? (Chance for Workbench) | Generator + ??? | - |
| Smithy | Chests: +8/15/30% Item Rarity, Quality bench, Boss at T3 | - | - |
| Workshop | Medallion | + Dynamo | Bronzeworks |
| Depot | Equipment | + Commander’s Chamber | Guardhouse |
| Guardhouse | Increased Monster Packs | 3x Guardhouse | Commander’s Chamber |
| Bronzeworks | Bench to improve equipment quality | Workshop + Dynamo | - |
| Thaumaturge’s Lab | Crystallised Corruption, Gem Workbench (Corruptions) | Sacrificial Chamber + Sacrifice Room | Dynamo / Chamber of Souls / Crimson Hall |
| Altar of Sacrifice | Vaal Cultivation Orb | - | - |
| Crimson Hall | Architect's Orb | Thaumaturge’s Lab + Sacrificial Chamber | - |
| Surgeon's Ward | Limb Modification | Prosthetic Research + Dynamo | Prosthetic Research |
| Prosthetic Research | Monsters grant increased XP | Surgeon's Ward + Dynamo | Surgeon's Ward |
| Chamber of Souls | Core Destabiliser | Thaumaturge’s Lab + Thaumaturge’s Lab | - |
| Sealed Vault | Chests | - | - |
| Dynamo | May contain a bench for equipment modification | Thaumaturge’s Lab + Sacrificial Chamber / Workshop + Dynamo | Bronzeworks / Surgeon's Ward |
| Spymaster's Study | Medallion (Duatlatoli’s) | Assassinate | - |
| Sacrifice Room | Sacrifice a room to upgrade | Sacrifice Room + Sacrifice Room | Sacrificial Chamber |
| Sacrificial Chamber | +8/15/30% Rare Chests, Unique, Boss, Unique Mod (T3) | Sacrifice Room + Sacrificial Chamber | Alchemy Lab / Corruption Chamber / Thaumaturge’s Lab / Crimson Hall |
| Alchemy Lab | +8/15/30% Item Rarity, Soul Core Corruption, Boss (T3) | 2x Sacrificial Chamber | - |
| Corruption Chamber | +8/15/30% Rare mod chance, Vaal Orb/Double Corrupt Bench, Boss | Sacrificial Chamber + Sacrifice Room | - |
| Flesh Surgeon | +8/15/30% Unique monster effectiveness, Limb Mod (T3), Boss | Synthflesh Lab (Powered) | - |
| Spymaster | Chance for Duatlatoli’s Medallion | Assassinate | - |
| Synthflesh Lab | +8/15/30% XP | Power | Flesh Surgeon |
| Legion Barracks | +15/30% Magic monsters | Conversion | Transcendent Barracks |
| Transcendent Barracks | +15/30% Rare monsters | 2x Conversion | - |
The most efficient path focuses on a repeating series of key rooms. A proven sequence on the main chain’s left side is:
Armory
Barracks
Spymaster
Barracks
Armory
(Repeat this pattern)
By following this order, each Armory and Barracks synergizes with Spymasters, multiplying loot potential and ensuring medallion generation for chain protection. Spymasters are especially powerful, they drop Duatlotls medallions and convert Barracks into Legion Barracks, further boosting medallion drops and loot.
Rooms cannot be placed arbitrarily; each has specific connection rules. For example, a Garrison can only connect to Commander, Armory, or Synth Flesh Lab. Attempting to place incompatible rooms together will fail, so planning is necessary.
The Sacrificial Chamber stands out for its consistent returns. Only one can exist in the temple, but when upgraded to rank 3, it guarantees a Vile Cultivation Orb every run, making it a reliable source of profit. This chamber will destabilize after use, but a protected chain remains intact.
Duatlotls: Protects a single room from destabilization.
Quippalatls: Ranks up a room, essential for maximizing room effects.
Uramottis: Grants a free room, accelerating temple expansion.
Zopex: Increases crystal capacity, allowing more runs between temple entries.
Ascapas: Increases medallion storage, letting players hold more for future use.
Side paths can house Golem Works (which requires two Generators), Flesh Surgeon (paired with Synth Flesh Labs), or Commanders. These rooms are useful for medallion generation but aren't necessary for the main chain. Use them as disposable buffers to absorb destabilization hits, keeping your core chain safe.
Building a profitable Vaal Temple in Path of Exile 2 is all about careful planning, medallion use, and chain protection. Create a single, long chain featuring Armory, Barracks, and Spymaster rooms. Use medallions to shield and upgrade your best rooms, and place sacrificial rooms at the ends to preserve your main sequence. Avoid loops and prioritize Spymasters for both loot and protection. With patience and the right setup, you can achieve impressive returns, including guaranteed Path of Exile 2 currency drops and powerful rewards every run. Below, we've sorted out the most effective strategy for you to follow:
Begin by learning how temple rooms connect. Each room can only be placed next to certain other rooms. For example, a garrison links to a commander, armory, or synth flesh lab, but not to a corruption chamber. Always check compatibility before placing a room to avoid blocking your progression.
Your primary goal is to build a long chain of valuable rooms. Start with a generator, then add a sacrificial chamber, followed by a Thorge, alchemy lab, armory, and so on. Follow the connection rules for each step.
Tip: Use a cheat sheet or in-game references to plan your path.
As you build, use medallions to safeguard important rooms:
Jatalot medallion: Protects a room, keeping your chain safe during destabilization.
Quipper medallion: Upgrades a room once, increasing its rewards.
Zopex and Ascappers medallions: Increase your crystal and medallion capacity, allowing you to store more progress between runs.
Puates medallion: Lets you reroll initial cards if your starting options are weak.
Uramot medallion: Grants a free room, speeding up expansion.
To reduce the risk of losing valuable rooms, place “unprotected” or expendable rooms at the ends of your chains. Destabilization tends to remove these first, keeping your main path intact.
Spy Masters are the core of a high-value temple.
Alternate between armory, barracks, and spy master rooms in your main chain.
Each Spy Master increases the chance for medallions and enhances rewards from nearby rooms.
Level up Spy Masters by placing an unprotected Spy Master further down the chain. When you close the temple, the protected Spy Master will upgrade.
Corruption chambers increase item rarity and add modifiers to rare monsters.
Position these rooms in your main chain to multiply loot quality.
Rooms like golem works and flesh surgeons, when placed off the main chain, can generate extra medallions.
Golem works level up easily with generators, providing a steady medallion supply.
Flesh surgeons should be placed away from your main loot path but still connected for occasional rewards.
Never connect your main chain back to the starting room in more than one place—loops can cause large sections to be deleted.
Don’t add commanders early in your main chain, as they can prevent you from placing Spy Masters later.
If you have open space on one side of the temple, continue building your main chain there.
Only reset your temple if you run out of expansion space or your layout is bricked.
Low-level resets: Use a low-level character to repeatedly open the Holton zone, keeping the league mechanic available for every run.
Boosting: Team up with someone to open zones for you if you’re high level.
Efficient mapping: Use movement skills and light radius to quickly find league mechanics in maps, then exit and repeat.
If you get stuck at a bugged door, roll into it and log out mid-roll. Upon logging back in, you should be past the obstacle.
Keep extending your chain with Spy Masters, corruption rooms, and sacrificial chambers. Use medallions to protect and upgrade as you go.
Always place expendable rooms at the ends as destabilization fodder.
As you collect medallions, continue improving the quality and protection of your main chain.


