


Bells
Animal Crossing
In Animal Crossing New Horizons, players have full control over the layout and design of their island. When it comes to the structures, the bridge construction is a necessary step of the island terraforming. In this article, we’ll focus on the ACNH bridge and incline sizes (width & length), types, prices, limits, and the guide to building a diagonal bridge.
Related Read: ACNH Airport Colors Guide
How to Play and Use Ocarina in ACNH
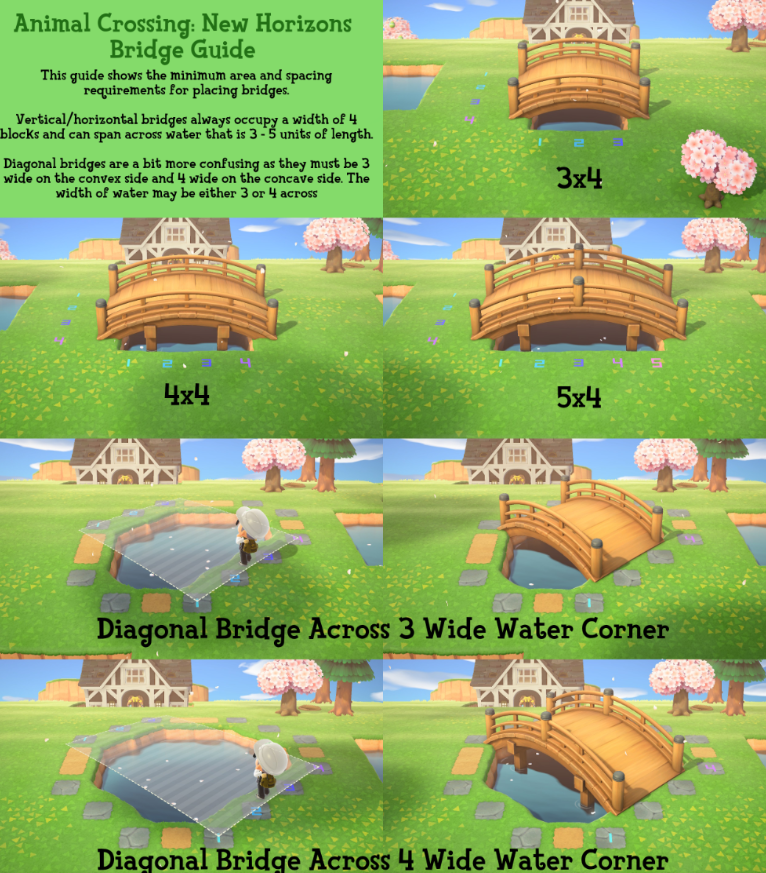
ACNH Bridge Size - Bridge Dimensions in Animal Crossing New Horizons
An anchor point is where the bridge connects to land via the invisible grid. The anchor point for a bridge requires four tiles, and the space that the bridge spans over the river is four tiles wide, therefore the total area grid space for a bridge inclusive of the anchor points and the river is six tiles by four tiles, this will be exactly the same for both vertical and diagonal setups.
How wide are bridges in ACNH? All bridges are 4 spaces wide, 2 for rail and 2 for workspace. Bridges can vary only through the width of the water, they can be placed over 3 - 5 wide rivers. This means you can’t build a bridge on a river that is less than 3 spaces and more than 5 spaces wide.
How long can bridges be in ACNH? A bridge can be 3, 4, or 5 tiles long.
Note: Vertical or horizontal bridges always occupy a width of 4 units and can span across water that is 3-5 in length. Diagonal bridges must be 3 wide on the convex side and 4 wide on the concave side. The width of the water may be either 3 or 4.
(Image from Pinterest)
ACNH Incline Dimensions - Width and Length of Inclines in Animal Crossing
Inclines are 2 wide and 4 long, 3 in front of the cliff, and 1 on top. That is to say, 2x1 spaces on the cliff, and 2x3 spaces on the land.
ACNH Bridge Prices & Types - How Much Do Bridges Cost in Animal Crossing
There is a total of 8 types of bridges available in the game, they come at different prices in Animal Crossing bells.
Log bridge: 98,000 Bells
Suspension bridge: 129,800 Bells
Stone bridge: 168,000 Bells
Wooden bridge: 168,000 Bells
Brick bridge: 198,000 Bells
Zen bridge: 228,000 Bells
Red zen bridge: 228,000 Bells
Iron bridge: 228,000 Bells
ACNH Incline Prices & Types - How Much Do Slopes Cost in Animal Crossing?
Natural ramp – 98,000 Bells
Blue-plank ramp – 128,000 Bells
White-plank ramp – 128,000 Bells
Stone staircase – 168,000 Bells
Log staircase – 168,000 Bells
Brick staircase – 198,000 Bells
Red steel staircase – 228,000 Bells
Blue steel staircase – 228,000 Bells
ACNH Bridge & Incline Limit - How Many Bridges Can You Have in ACNH?
There is a limit to the building of both bridges and inclines, the maximum deployment you can have is 8 bridges and 8 inclines. So you need to plan out exactly where to build them and avoid wasting time and money.
Note:
After the ACNH 2.0 Update 2021, the maximum number of bridges and inclines will be changed to 10.
How to Get More Bridges in ACNH?
You will not be able to create the second bridge until you upgrade the Resident Services into a town hall. After you build your first bridge, which is free, talk to Tom Nook and choose "Let's talk infrastructure." to make more bridges. But you can only build one bridge or incline a day.
Where Is the Best Place to Put a Bridge in Animal Crossing?
When it comes to the placement of ACNH bridges, a bridge needs a space across the river that is 4 spaces wide side-to-side and 3-5 spaces across the water. It is recommended to place your bridge as close to the mouth of a river as possible. The bridge should be placed toward the spacious part of your island that leads toward the cliffs.
Can You Move a Bridge in Animal Crossing?
Bridges and inclines are immovable. They can only be dismantled and rebuilt.
ACNH Diagonal Bridge Guide - How to Build a Diagonal Bridge in Animal Crossing
How to create the correct layout for building diagonally placed bridges? All you need to do is to learn how to create a diagonal grid space, the bridge will follow the same construction rules, in terms of the area covered which is six tiles long and four tiles wide.
1. Starting a bridge project
Talk to Tom Nook and choose “Let’s build a bridge”, then select one from the list of bridges and pay for it, you’ll get a construction kit.
2. Planning out the anchor points
Start on one by creating the diagonal tiles that are four tiles wide follow the grid alignment and terraform a single hole in the ground diagonally, half a tile emerges in the form of corner tiles protruding from the grid edge to finalize the diagonal anchor point, simply cut off the corners of the tile creating a seamless diagonal anchor point.
3. Create diagonally placed tiles
Instead of it being four tiles long, this time it will be six, cut off the corners from the grid space and remove the excess material in between the two anchor points, your focus is on creating two established anchor points so that you can start construction on the bridge.
4. Complete another anchor point
Repeating step one to create the last anchor point on the other side of your bridge, if you have followed the steps correctly your bridge will be able to be built, if you can’t, figure out via the silhouette of the bridge area where you need to add or remove land and try to deploy it again.


